
In this blog we cover how you can automatically load Power BI activity logs (or any other Office365 activity) into a database for detailed analysis across all workspaces in your tenant.
The advantage in comparison to using the inbuilt Office365 log analysis is that you are not limited by log expiration periods (typically only the last 90 days are available) and with the data in a standard relational format you can use it for comprehensive analytics in Power BI. The usage metrics in Power BI give you limited analysis options but only for one workspace. We were inspired to write this blog by Neale Analytics’ template (https://powerbi.microsoft.com/en-us/blog/announcing-the-power-bi-usage-metrics-solution-template/) that is also using Azure functions. We have added automation with Microsoft Flow and Power Query and are also covering secure password encryption.
1. Create Azure Function App
An Azure function app is the container that hosts all the individual execution functions. The function app is created in the App service hosting plan.
Let’s look at how to create the “Function App”:
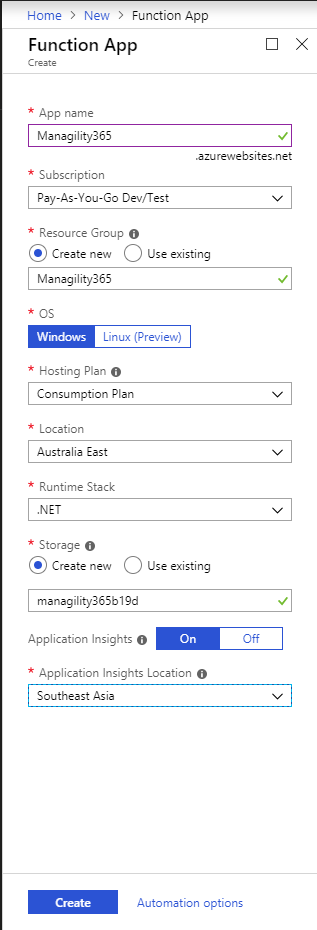
Step 1: Login to Azure portal and Select Create a resource on the upper left-hand corner of the Azure portal, select Compute, then Select “Function App”.

Step 2: Create Function App settings as specified below: (you can have your own App name or choose a different Application Insights Location), once all are set click on “Create”.
- Let’s have a quick look what’s the difference between “Consumption” plan and “App Service Plan”
For the Consumption plan, Azure functions are nearly free in regards to computing charges. The basic plan will give you 1 million executions and more than 400,000 (!) GB of bandwidth, which is more than enough for our purpose. The only limitation of this plan is that, the Azure functions execution cannot exceed 5 minutes, after 5 minutes, the execution will be automatically terminated, this is due to the virtual machine backed. If you have functions that may potentially exceed 5 minutes, you might need to choose another App service plan.
For the App Service Plan pricing details, please refer to this link: https://azure.microsoft.com/en-au/pricing/details/app-service/windows/
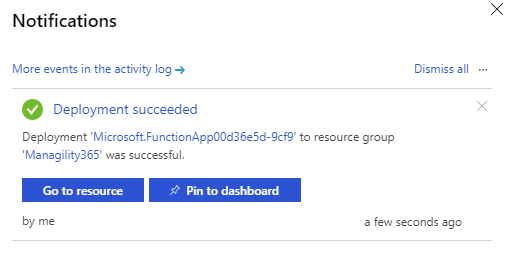
If the deployment has completed successfully, you will see the notification on your right hand top menu, as shown in the image below:
2. Create Azure Function
Before we created the Azure function, make sure that we need to set the Azure App runtime to version 1.

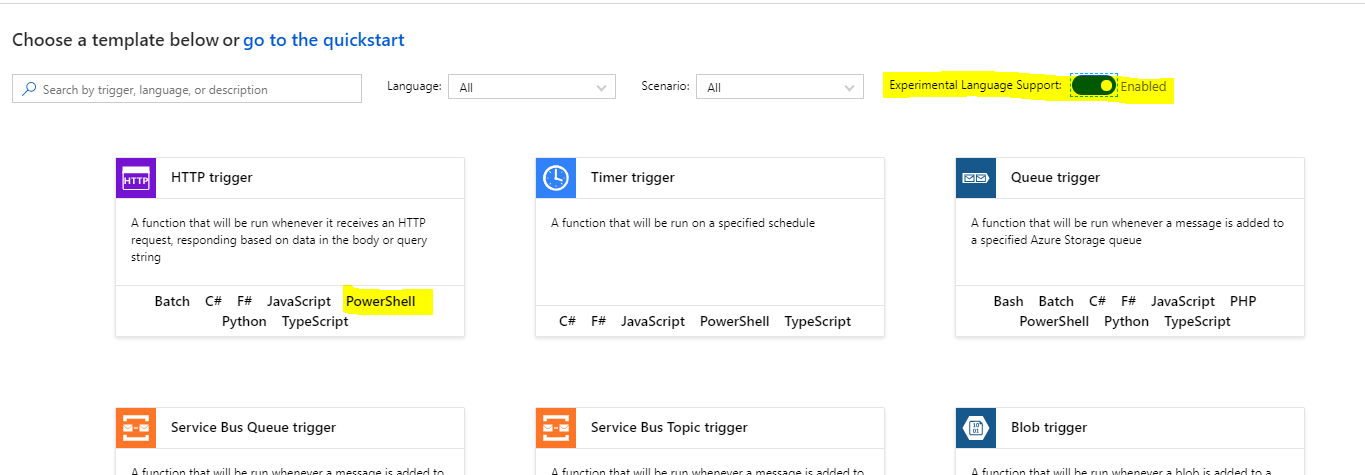
Next, click Functions Item on the left-hand menu, and select “New function”.

We will create a HTTP trigger Azure function, ensure that the Experimental Language Support is enabled.
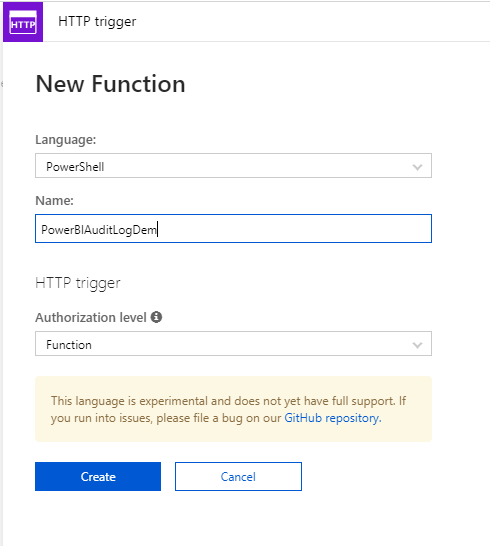
Fill out the Function name at the right hand side when prompts, and click Create.
3. Set up Azure function on connect to Office365
For reading the Power BI logs we will be using a Powershell script. This script will require the installation of the MSOnline module to connect to Office365. The MSOnline Powershell module has to be uploaded to Azure FTP. First, we need to retrieve the Azure FTP details from the Azure portal.
3.1 Configure and retrieve the FTP detail from Azure Portal
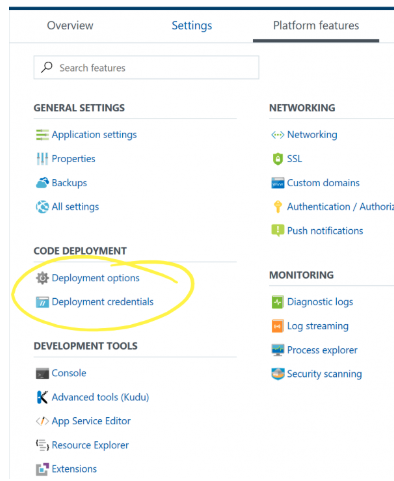
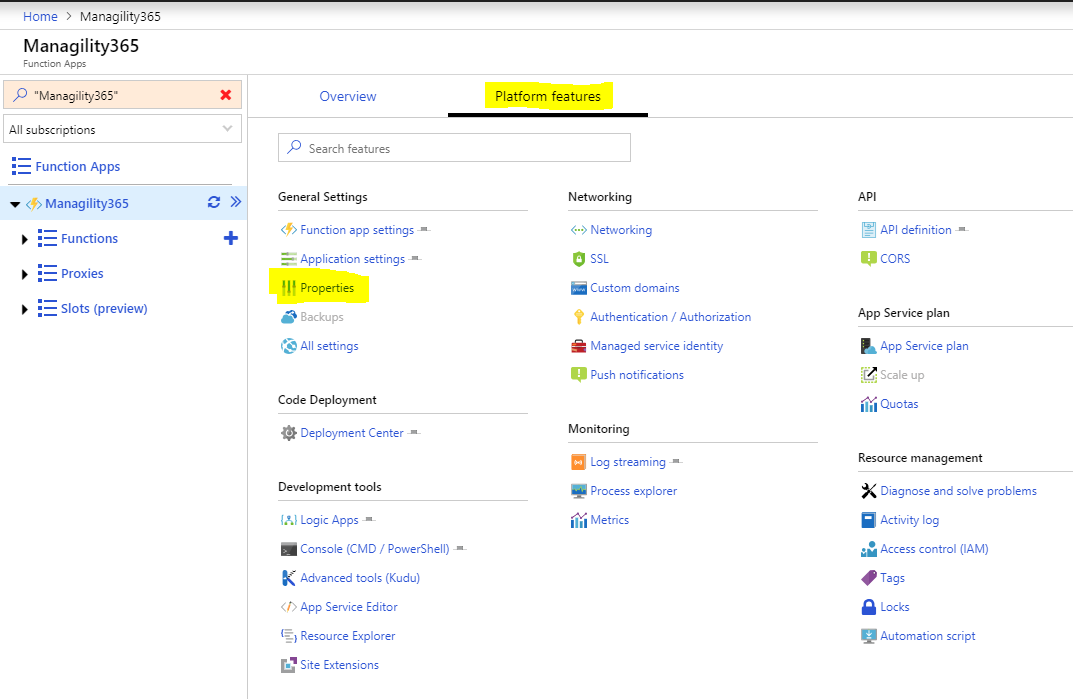
Select the name of the Function Apps on the left hand menu, and select Platform Features on the right hand tab.
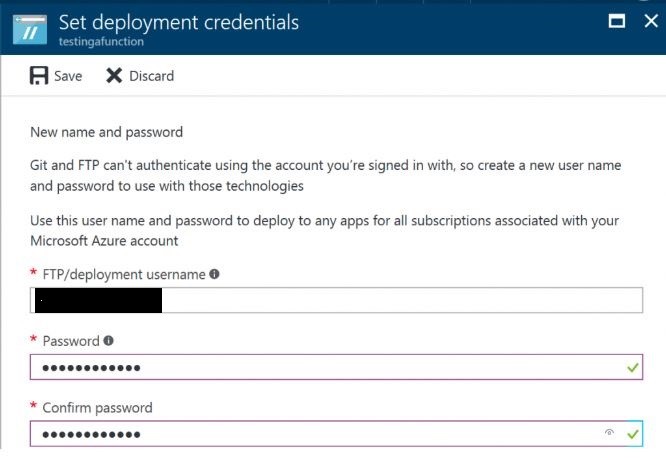
If you have not setup the deployment credentials, click Deployment credentials, to setup the FTP credentials.
Enter the username and password for the FTP setup:
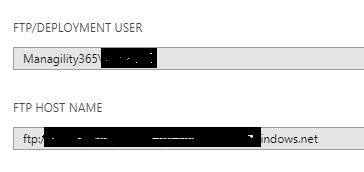
Once the deployment credentials have been setup, you can click Properties in General Settings.
Just copy the FTP details into your notepad, you will need this to connect to the storage of the function and upload the Powershell MSOnline Module.
3.2 Upload MSOnline module to Azure Function Storage
Next, let’s download the MSOnline Module and upload to the function storage via FTP. Open your Powershell on your computer or server, then run the following Powershell code:
Code Segment:
$path = “C:\tempFolder”;
# if folder not existed, create the folder
If(!(test-path $path))
{
New-Item -ItemType Directory -Force -Path $path
}
Save-Module msonline -Repository PSGallery -Path $path
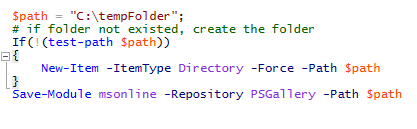
After running this code, you will see that the MSOnline module folder has been created.
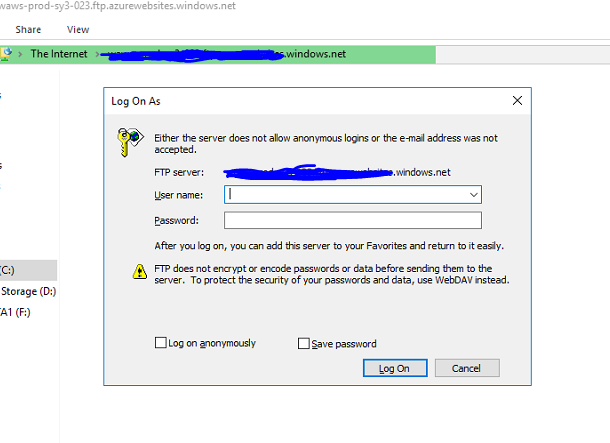
Next, let’s upload this module into Azure function storage via FTP, copy the URL that you have pasted in your notepad, enter the username and password.
Navigate to your FTP to your azure function folder, the folder path is site/wwwroot/<YourFunctionName>. Create a new folder called bin.
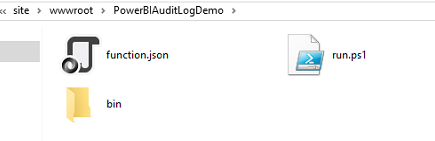
Next, open the bin folder, and copy the MSOnline module that you have downloaded in C:/tempFolder.

3.3 Encrypt Office365 credentials and upload key file to Azure Function Storage
For the MSOnline Powershell module, we need to use Office365 credentials within the Azure function App, as we don’t want to expose our password in plain text, we need to encrypt our password. Let’s use Powershell to generate encrypt password to be used in Azure Function.
In your local computer, open Powershell ISE, and run the following code:
$AESKey = New-Object Byte[] 32
$Path = “C:\tempFolder\Password.key”
$EncryptedPasswordPath = “C:\tempFolder\EncryptedPassword.txt”
[Security.Cryptography.RNGCryptoServiceProvider]::Create().GetBytes($AESKey)
Set-Content $Path $AESKey
$Password = Read-Host “Please enter your password”
$secPw = ConvertTo-SecureString -AsPlainText $Password -Force
$AESKey = Get-content $Path
$Encryptedpassword = $secPw | ConvertFrom-SecureString -Key $AESKey
$Encryptedpassword | Out-File -filepath $EncryptedPasswordPath
After running this above code, it will generate two files with your input password to encrypt in your C drive tempFolder.
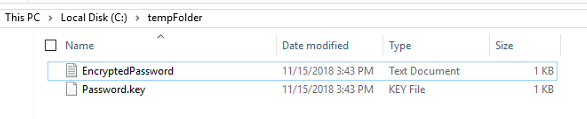
Upload your Password.key file into your FTP bin folder.
4. Azure Function App Setting
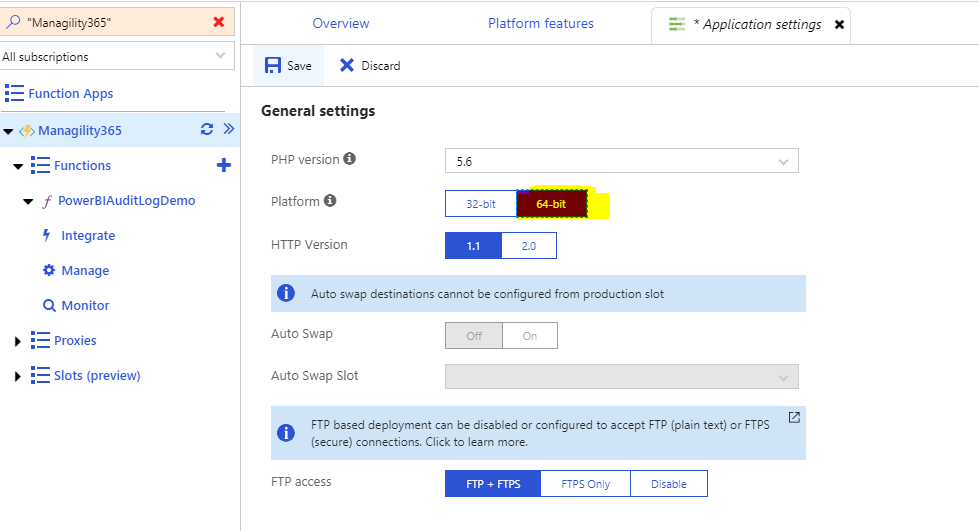
We will set the username and password into application setting as environmental variable for the admin account or the user account that has access to the PowerBI Auditlog permission. Let’s return to the Azure function, Select Platform Features, Select Application settings.

Ensure that the Platform uses a 64 bit run-time.
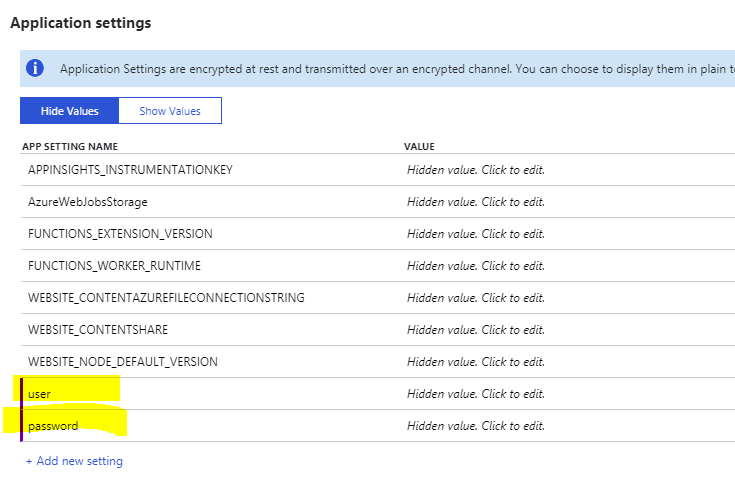
In the application setting, we will create two environmental variables for Azure function use. Click “Add new Setting”.

Add a user variable for your admin account or the account with Audit Log permission and add a password variable, just copy the content of the “EncryptedPassword.txt” file in the value filed, once you have done that, you can delete the “EncryptedPassword.txt” file in your local computer.
Click Save at the top right panel.

5. Create PowerShell Code to retrieve PowerBI Audit Log records
Click the left hand menu function name, copy the PowerShell Code into run.ps1, Update the variables on the top of the script and ensure they have matched the function name, MSOnline Module name and module version. You will need to also update the key path of your password.key file.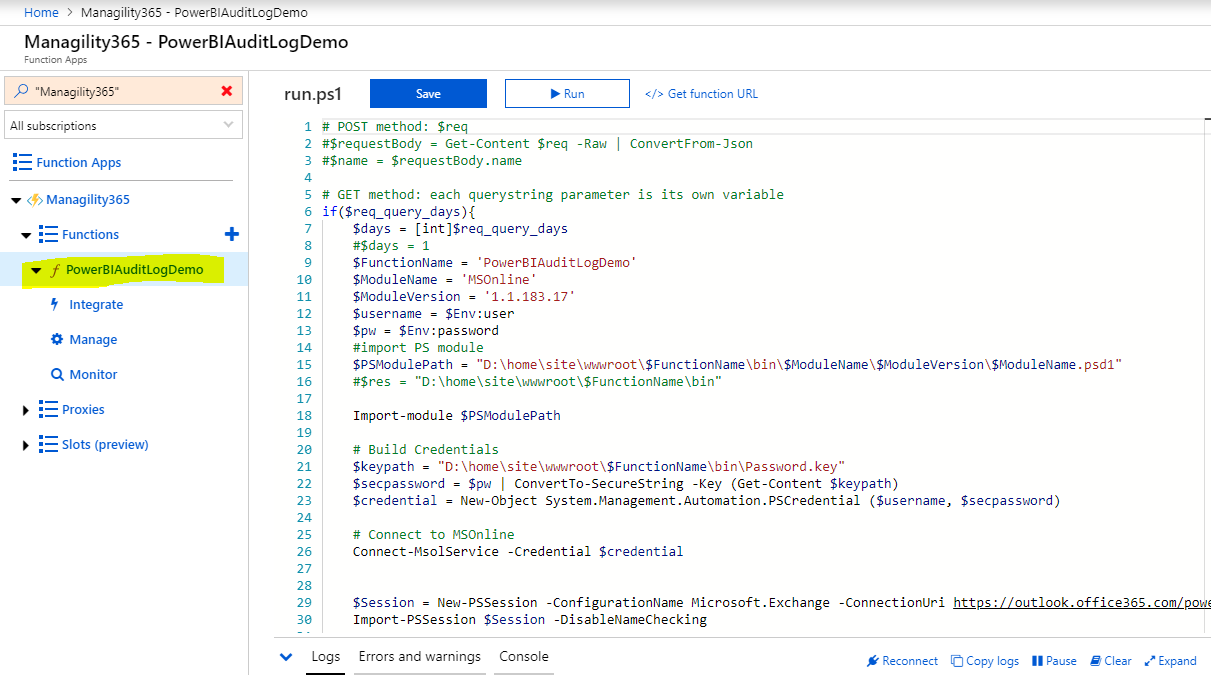
Now, we will save it and test it.
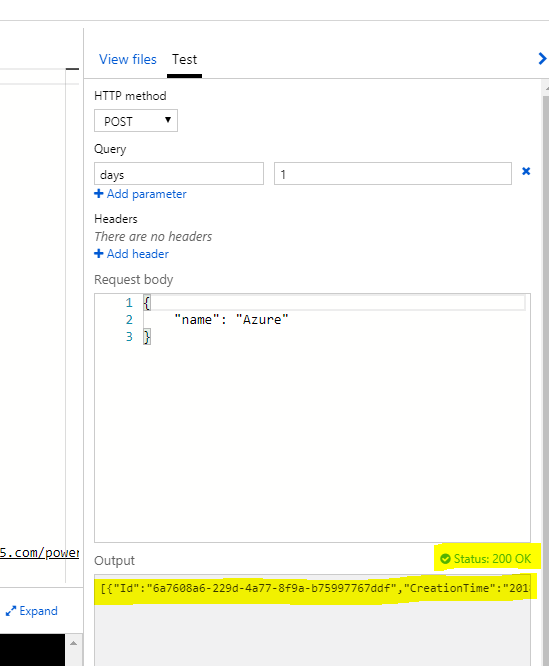
We have now successfully created the azure function in Powershell to retrieve the PowerBI auditlog records, Notice that I have put the days parameter as 1, which means I am retrieving only one day of Log records, we can also change the days parameter into a different number of days for which you would like to retrieve the log records. This will obviously increase the function execution time.
6. Wrap up Azure function as custom serverless API
After we have tested the Azure function successfully, we can wrap up this azure function as custom API, so that the API can be called from MS flow, PowerApps or other custom applications if you may have.
By default, your HTTP-triggered function is configured to accept any HTTP method. There is also a default URL of the form http://<yourapp>.azurewebsites.net/api/<funcname>?code=<functionkey>. this section, you will modify the function to respond only to GET requests against /api/ route with the parameter days to the query string in the URL, for example: /api?days=1
6.1 Custom your HTTP functions
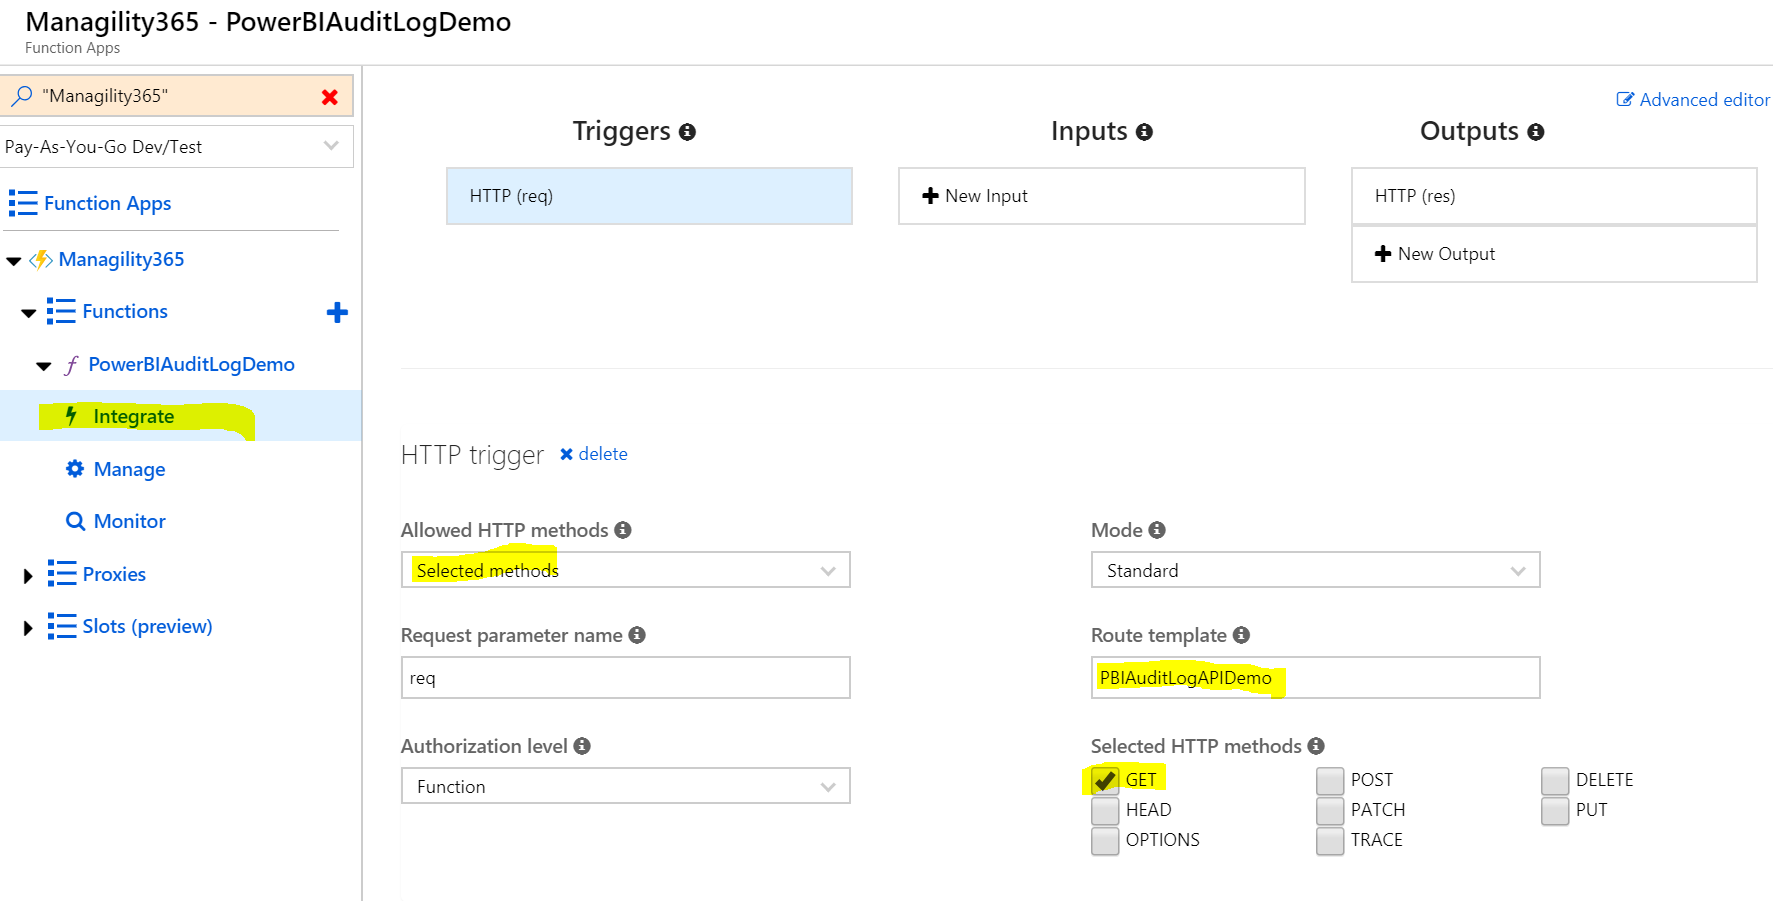
Navigate to the Azure function in Azure portal and select Integrate in the left navigation, we can choose HTTP methods for our custom API later on, here i choose GET method only as we will only need to get audit log from PowerBI, for the route template, I will input “PBIAuditLogDemo”.
6.2 Custom API definition
Select the function app at the left hand side and select Platform Features, then API Definition, after that, click the button Generate API definition template, it will generate the API definition template for us, then we can customize it later on.
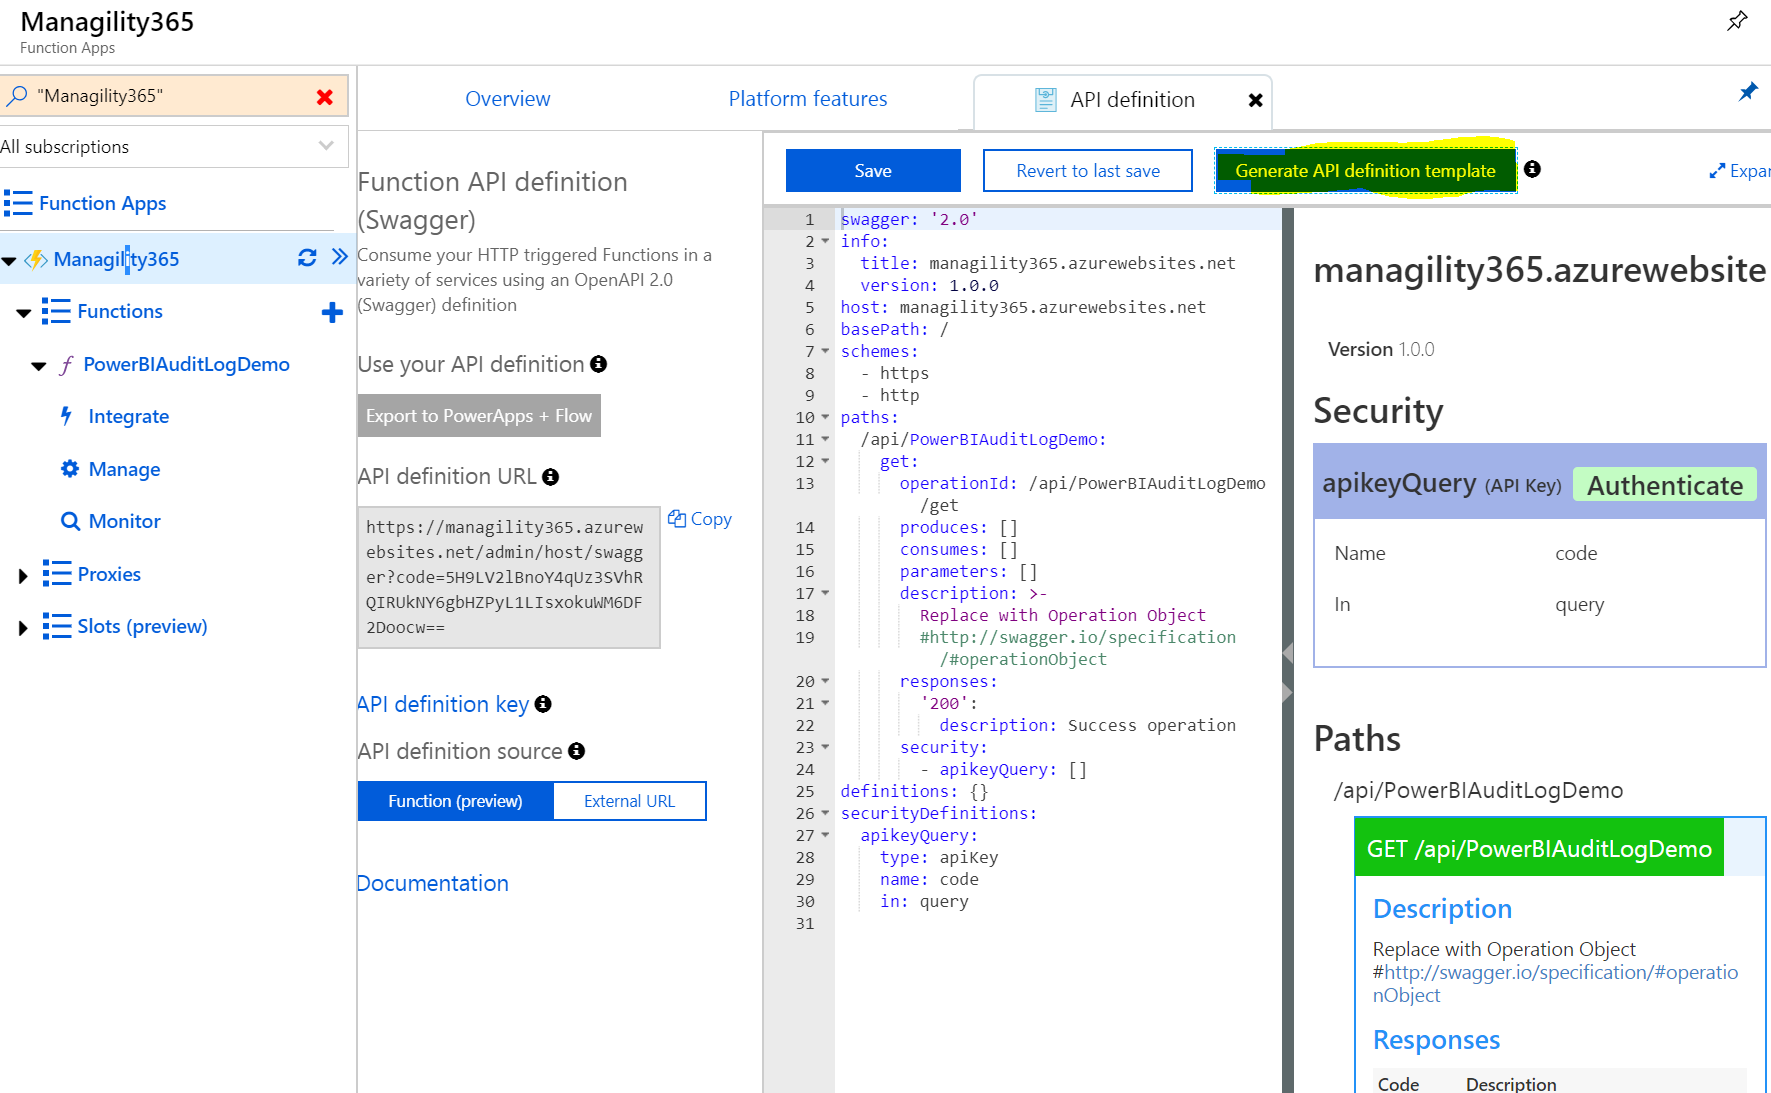
Next, we can customize the API definition, once finished, click Save.
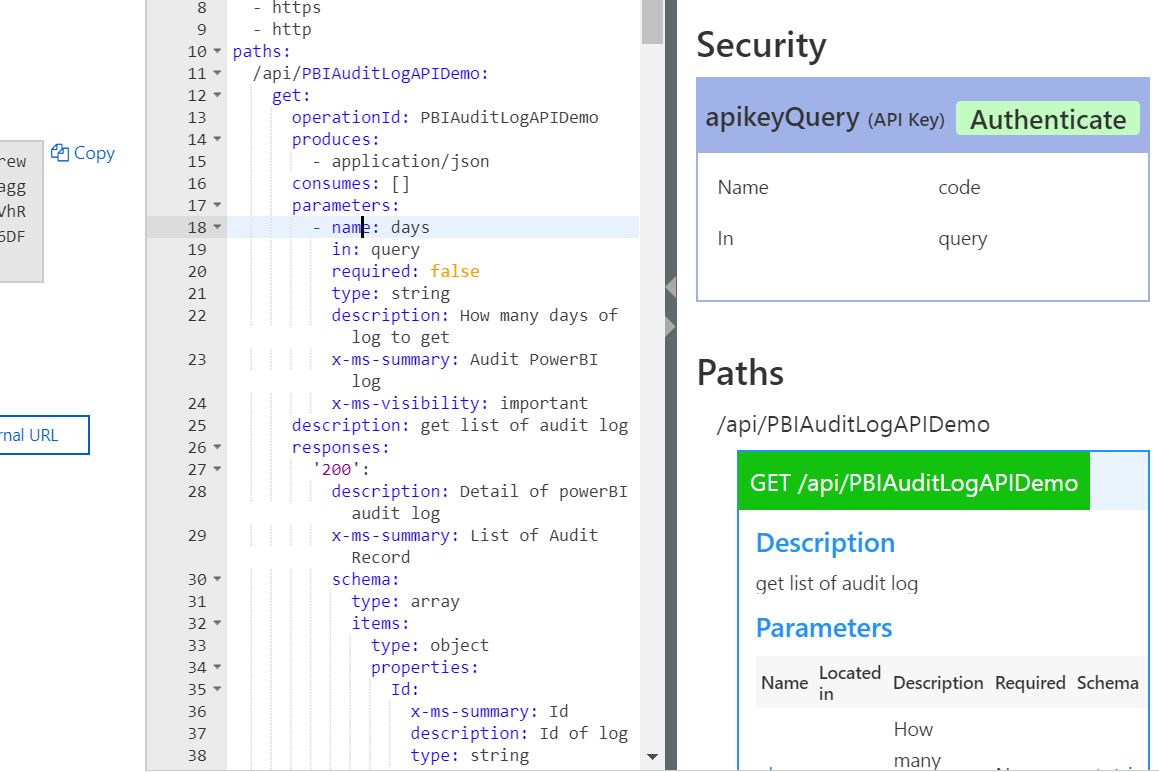
6.2.1 PowerBI Audit Log Custom API Definition
swagger: ‘2.0’
info:
title: <from API definition template>
version: 1.0.0
host: <from API definition template>
basePath: /
schemes:
– https
– http
paths:
/api/PBIAuditLogAPIDemo:
get:
operationId: PBIAuditLogAPIDemo
produces:
– application/json
consumes: []
parameters:
– name: days
in: query
required: false
type: string
description: How many days of log to get
x-ms-summary: Audit PowerBI log
x-ms-visibility: important
description: get list of audit log
responses:
‘200’:
description: Detail of powerBI audit log
x-ms-summary: List of Audit Record
schema:
type: array
items:
type: object
properties:
Id:
x-ms-summary: Id
description: Id of log
type: string
CreationTime:
x-ms-summary: CreationTime
description: CreationTime of log
type: string
format: date-time
CreationTimeUTC:
x-ms-summary: CreationTimeUTC
description: CreationTimeUTC of log
type: string
format: date-time
RecordType:
x-ms-summary: RecordType
description: RecordType of log
type: integer
format: int32
Operation:
x-ms-summary: Operation
description: Operation of log
type: string
OrganizationId:
x-ms-summary: OrganizationId
description: OrganizationId of log
type: string
UserType:
x-ms-summary: UserType
description: UserType of log
type: integer
format: int32
UserKey:
x-ms-summary: UserKey
description: UserKey of log
type: string
Workload:
x-ms-summary: Workload
description: Workload of log
type: string
UserId:
x-ms-summary: UserId
description: UserId of log
type: string
ClientIP:
x-ms-summary: ClientIP
description: ClientIP of log
type: string
UserAgent:
x-ms-summary: UserAgent
description: UserAgent of log
type: string
Activity:
x-ms-summary: Activity
description: Activity of log
type: string
ItemName:
x-ms-summary: ItemName
description: ItemName of log
type: string
WorkSpaceName:
x-ms-summary: WorkSpaceName
description: WorkSpaceName of log
type: string
DashboardName:
x-ms-summary: DashboardName
description: DashboardName of log
type: string
DatasetName:
x-ms-summary: DatasetName
description: DatasetName of log
type: string
ReportName:
x-ms-summary: ReportName
description: ReportName of log
type: string
WorkspaceId:
x-ms-summary: WorkspaceId
description: WorkspaceId of log
type: string
ObjectId:
x-ms-summary: ObjectId
description: ObjectId of log
type: string
DashboardId:
x-ms-summary: DashboardId
description: DashboardId of log
type: string
DatasetId:
x-ms-summary: DatasetId
description: DatasetId of log
type: string
ReportId:
x-ms-summary: ReportId
description: ReportId of log
type: string
OrgAppPermission:
x-ms-summary: OrgAppPermission
description: OrgAppPermission of log
type: string
DataflowType:
x-ms-summary: DataflowType
description: DataflowType of log
type: string
DataflowRefreshScheduleType:
x-ms-summary: DataflowRefreshScheduleType
description: DataflowRefreshScheduleType of log
type: string
IsSuccess:
x-ms-summary: IsSuccess
description: IsSuccess of log
type: boolean
security:
– apikeyQuery: []
definitions: {}
securityDefinitions:
apikeyQuery:
type: apiKey
name: code
in: query
6.3 Use your API definition
After saving the API, we can now start using this API, and manage the results in Microsoft Flow.
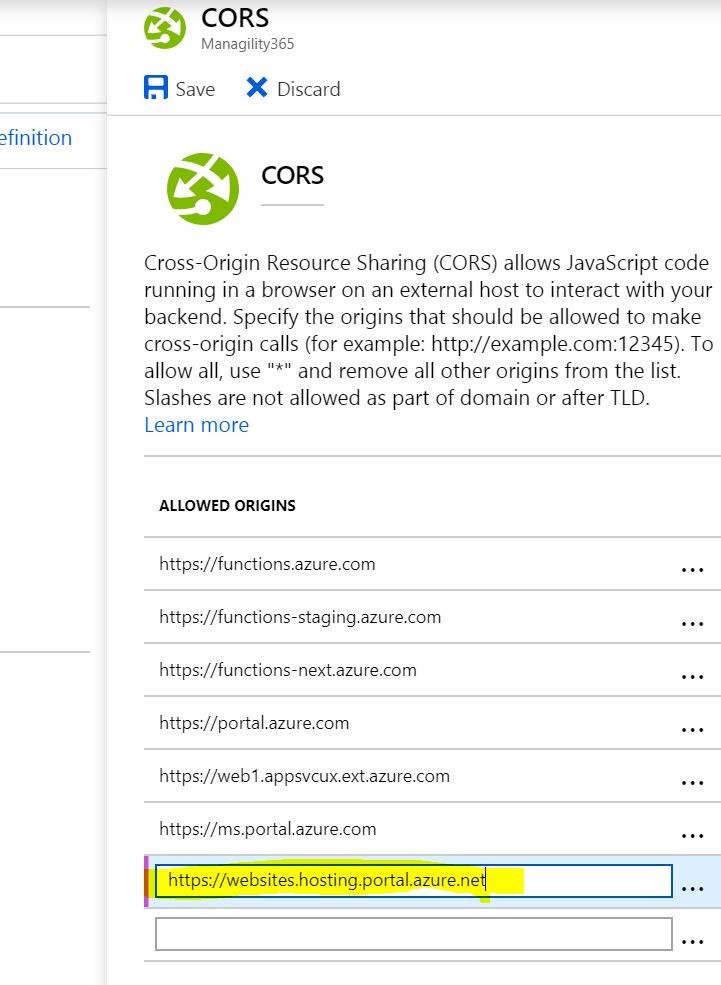
If you get the error below, please add the web URL in the hint box into your CORS setting in the “Platform features” tab.
Navigate back to your Platform Feature, and select “CORS”

Add the URL into the CORS rule.
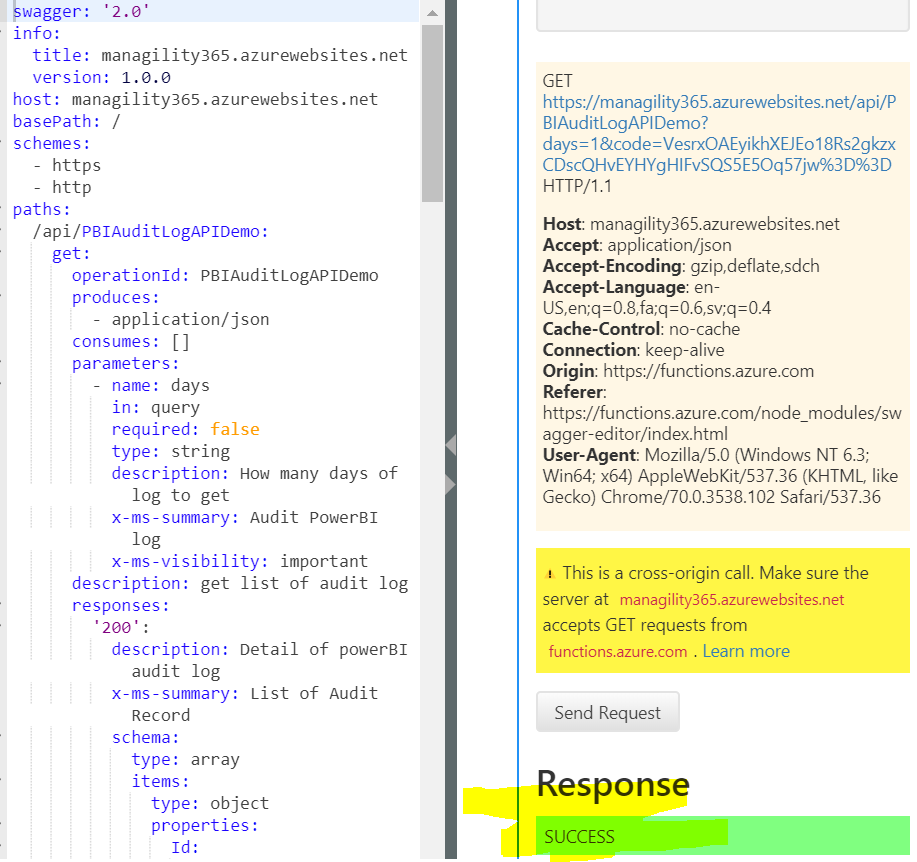
Now we can try this operation and see if it works.
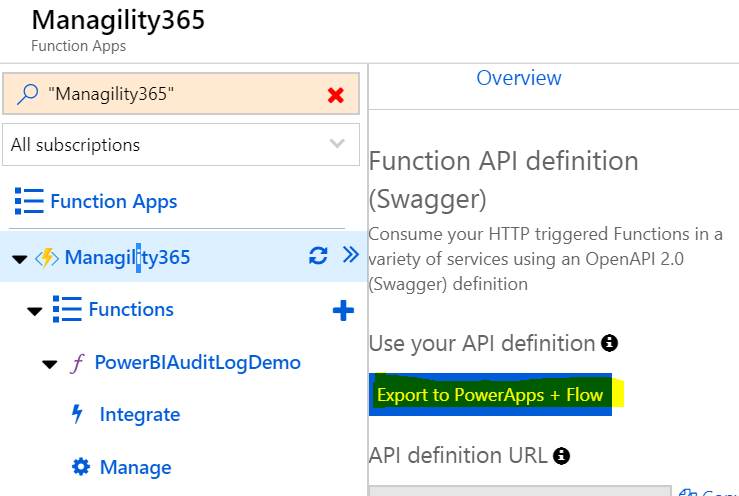
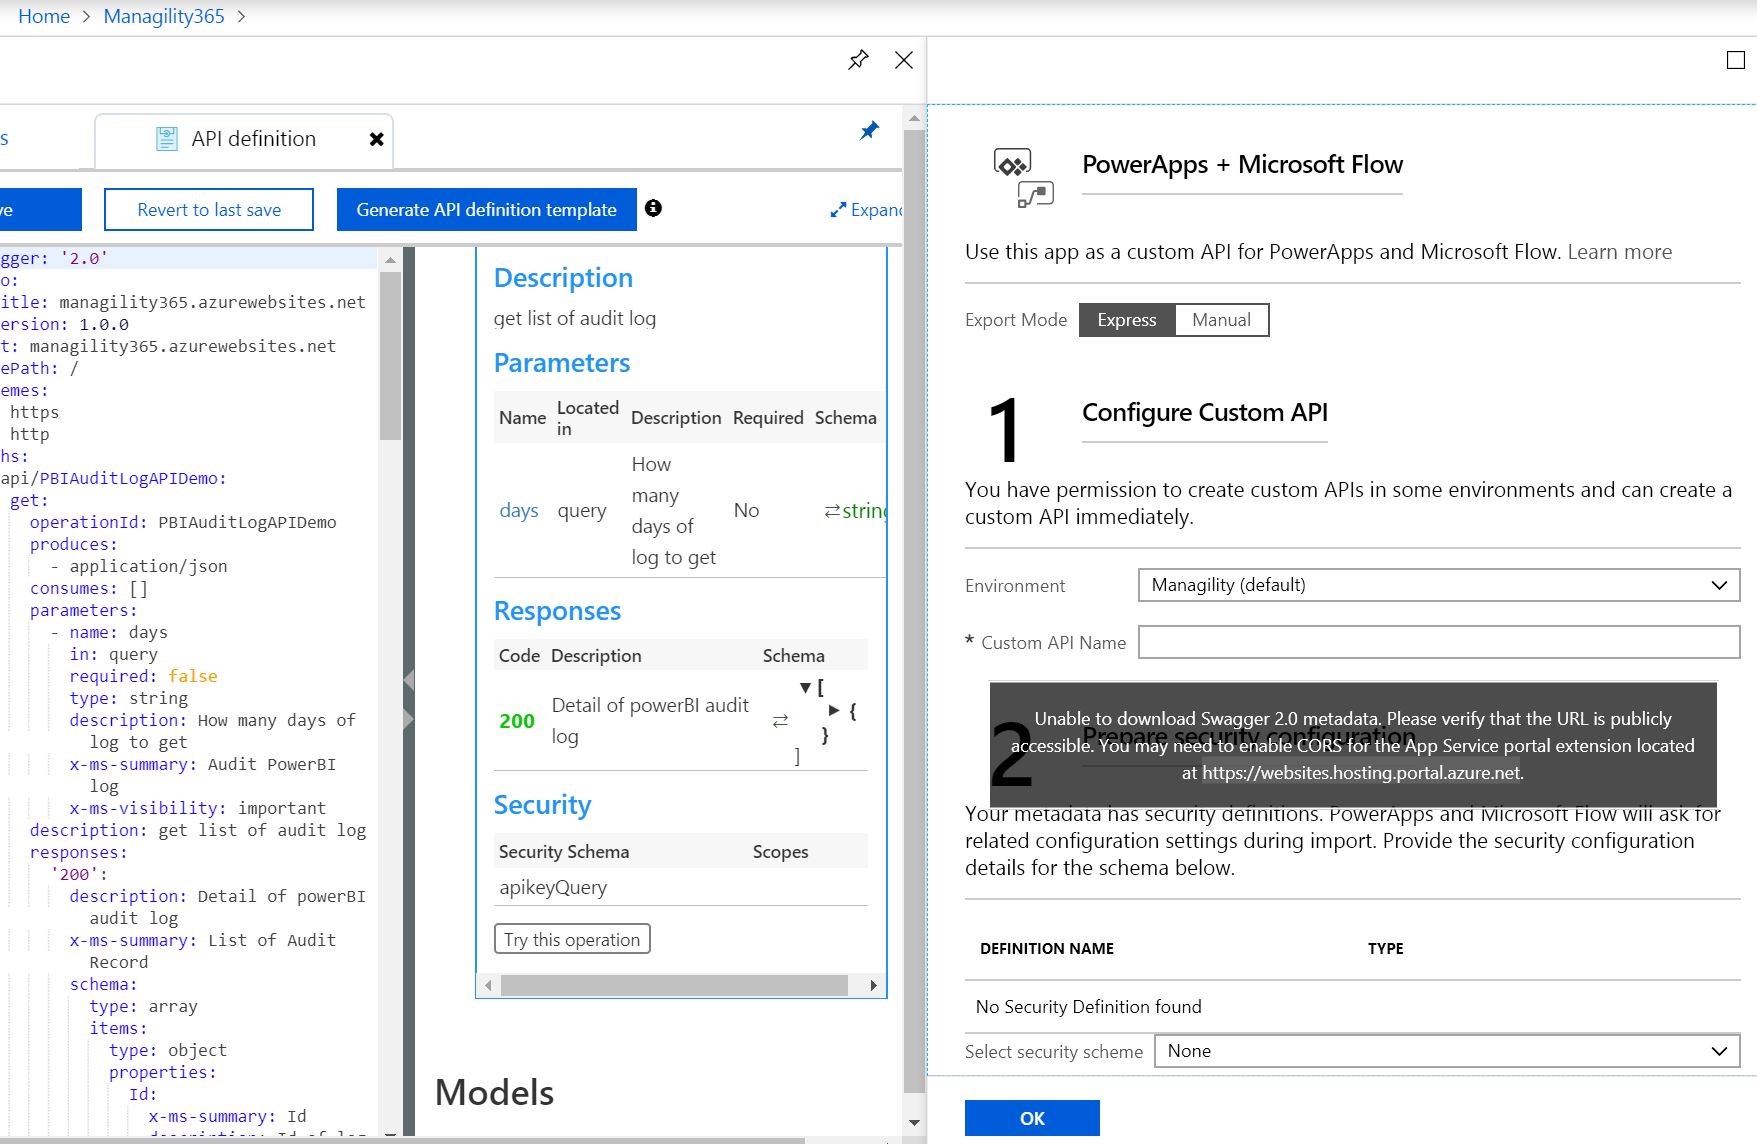
Perfect! Next, Navigation back to the API definition and click Export to PowerApps + Flow Button, Fill in the Custom API Name and select the security schema, then click OK.
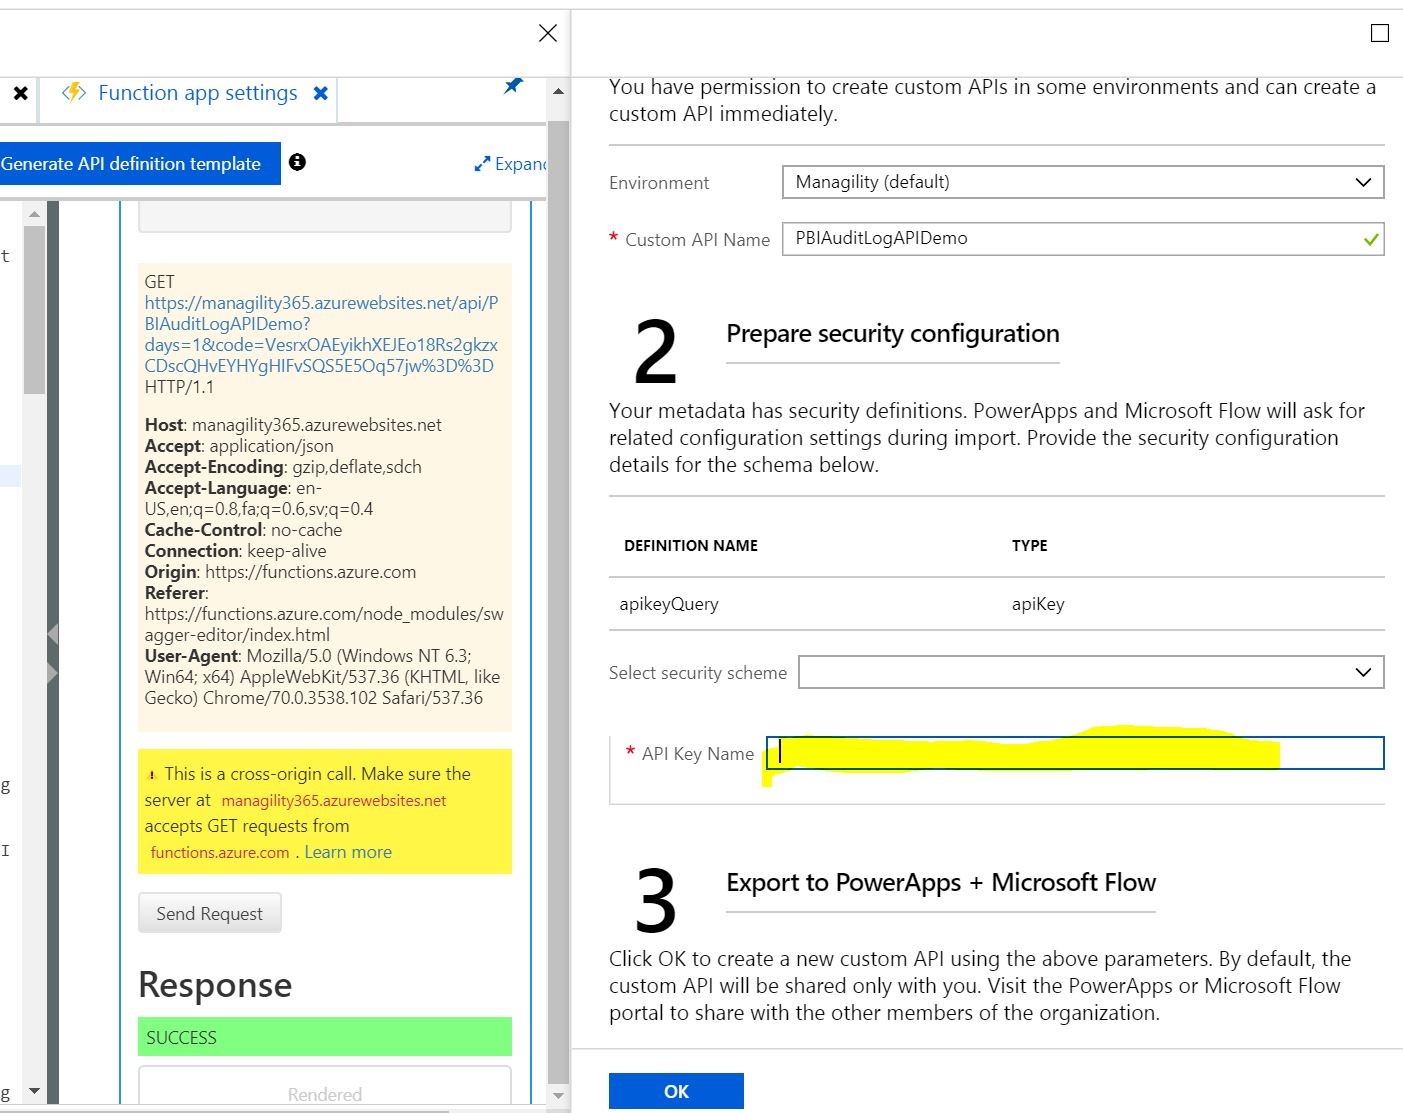
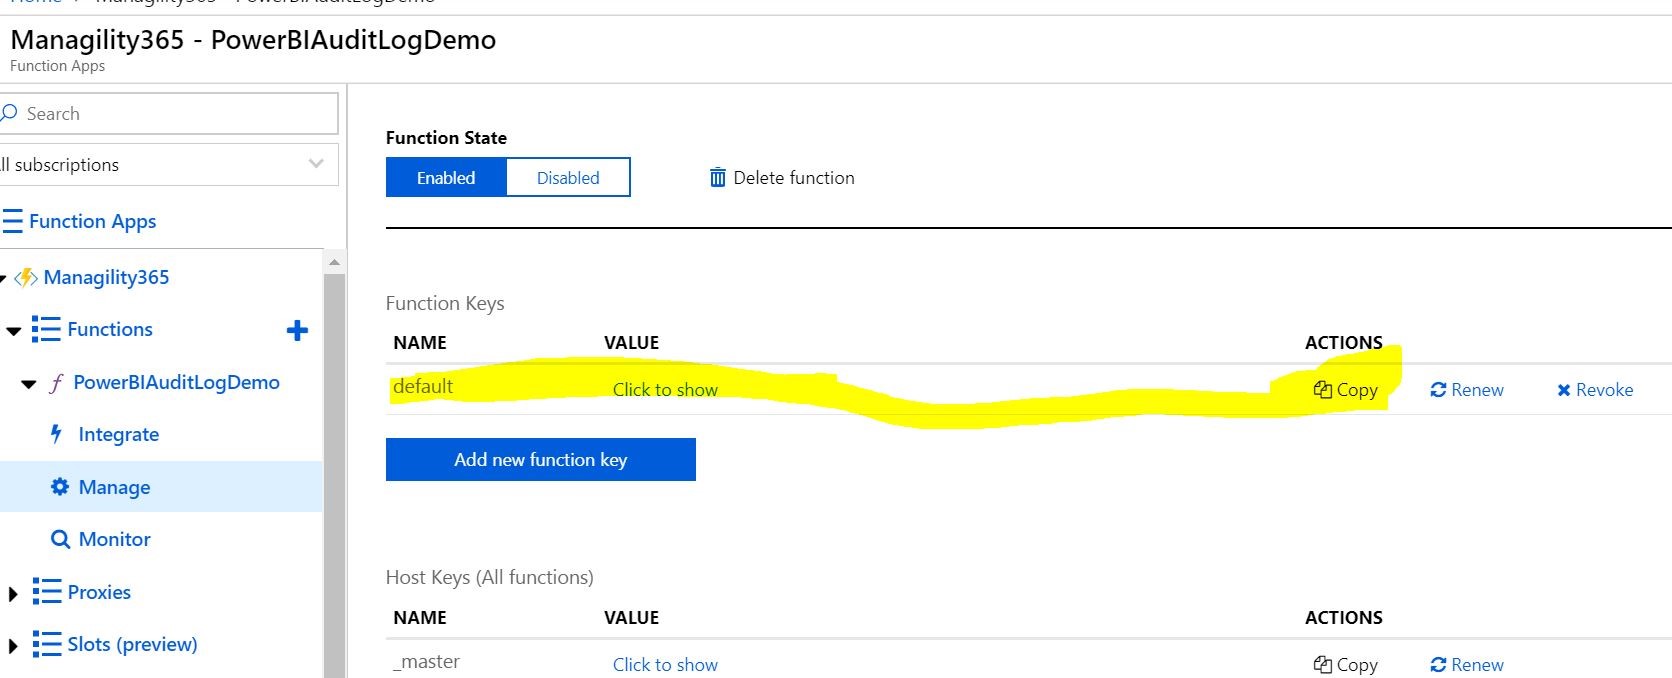
To get the API Key Name, we can go back to the function, Click Manage, you can copy the key and paste it into the above API Key Name input box.
After that, we have successfully deployed our API to Flow.

7. Execute Azure Function from MS Flow
7.1 Create Connector
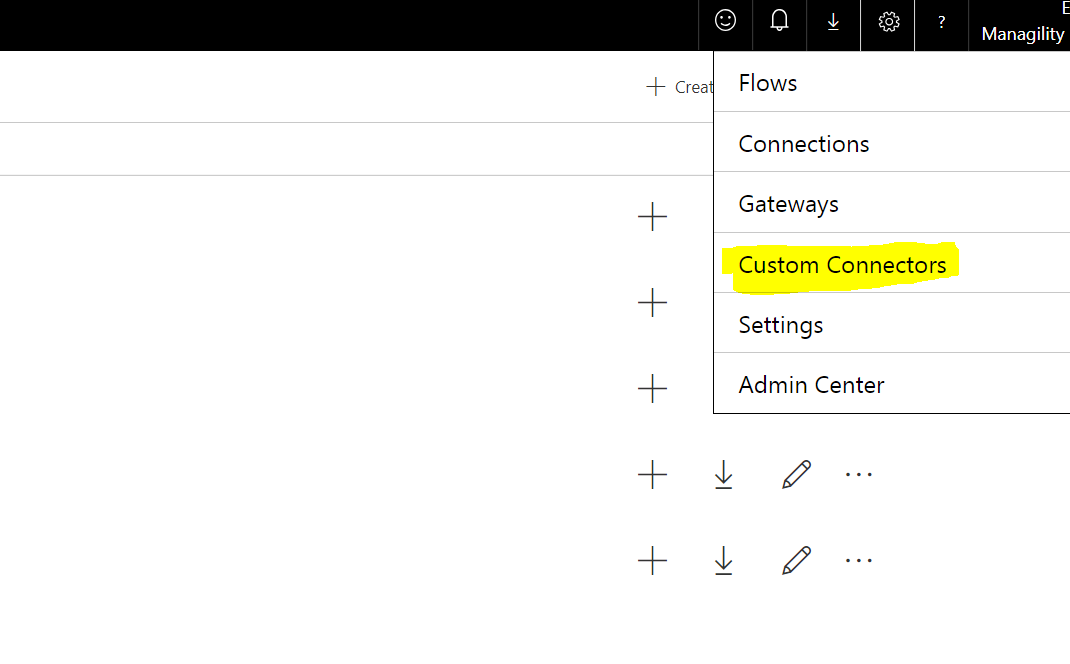
Login into MS Flow, and navigate to the right top setting icon, and select Custom Connectors.
You can see your custom API is already there for you to set up, we need to create an action for the API calls, click the edit icon.

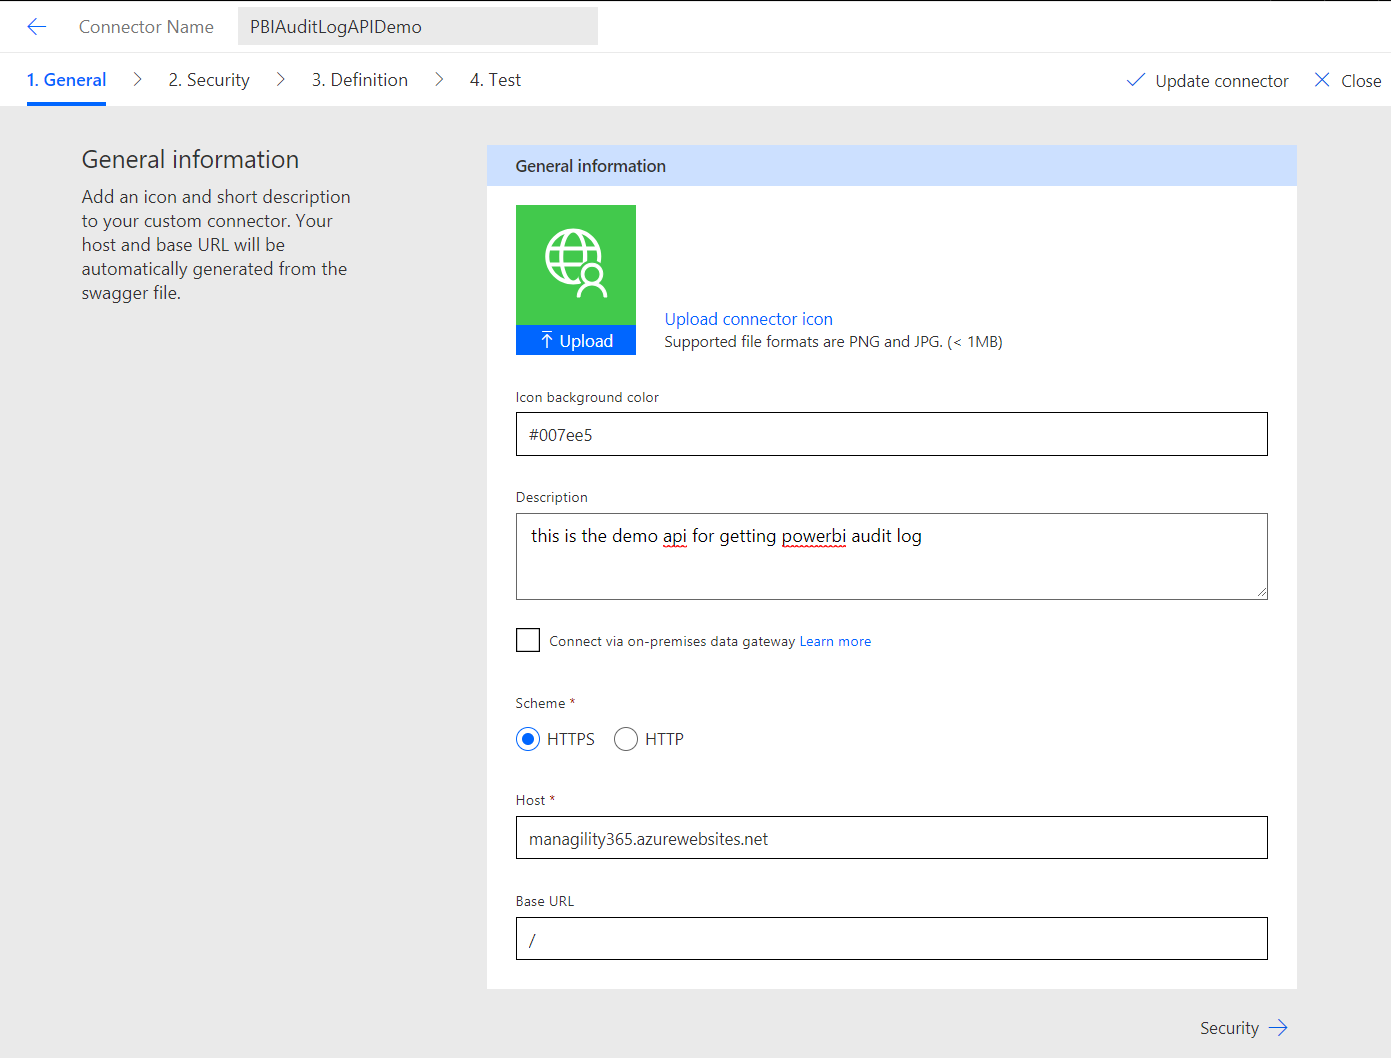
In the “General” tab, you can fill out the general information like background color or description, you can also leave it as blank.
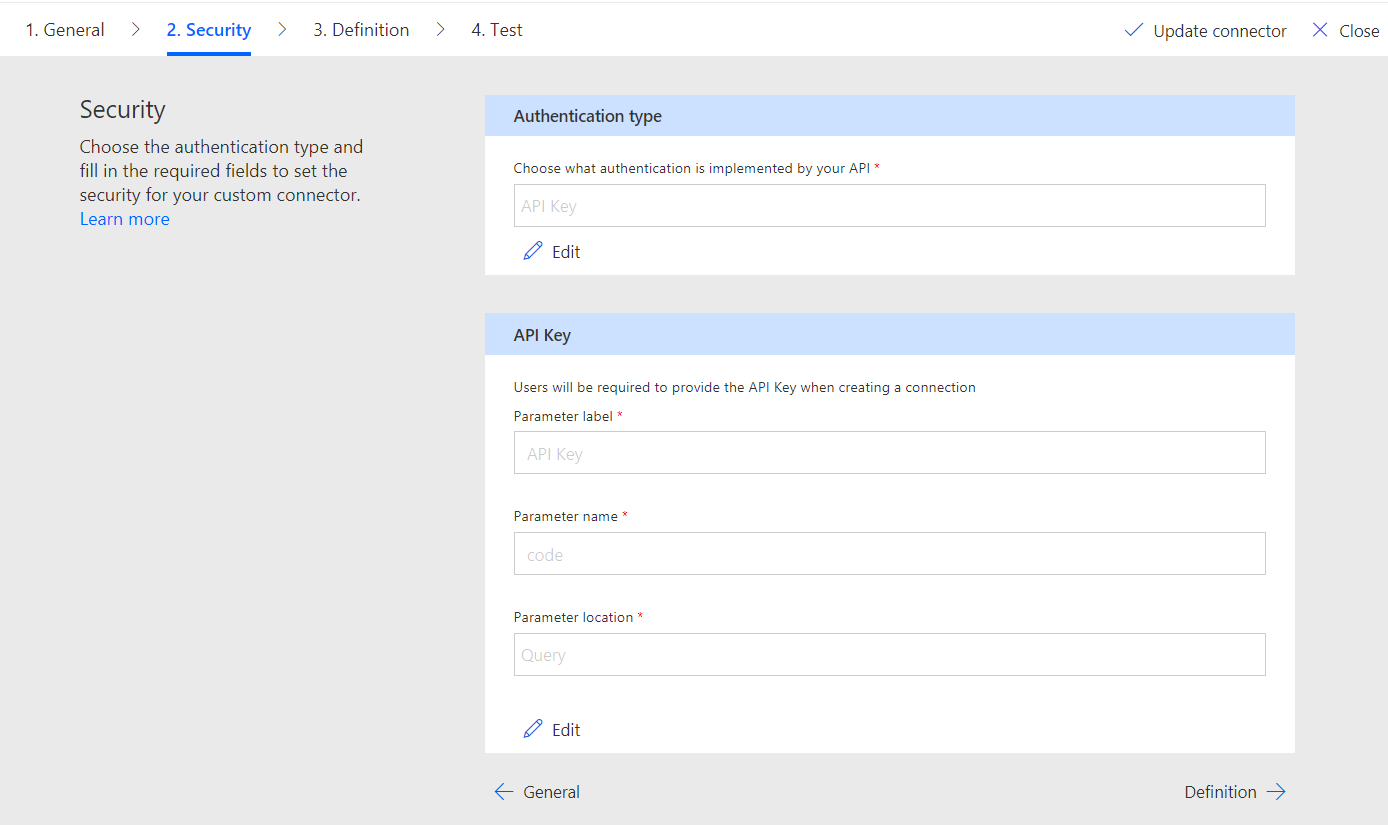
Next, Let’s move on to the Security Tab, you can leave it as is.
Move on to Definition Tab, Fill in the Summary and description.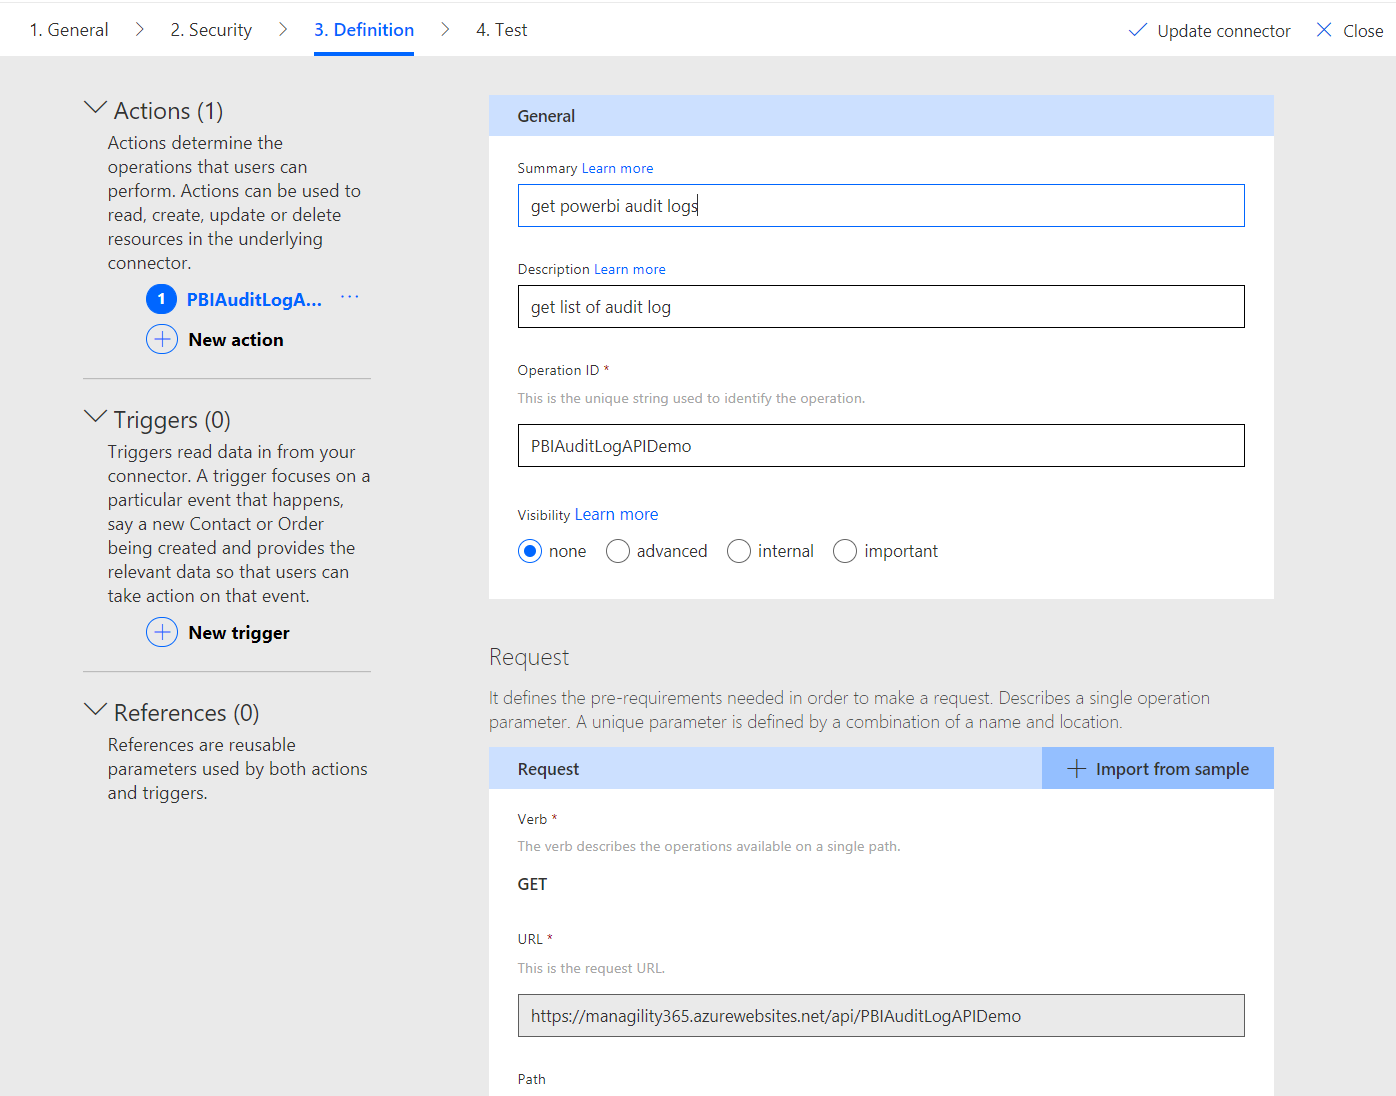
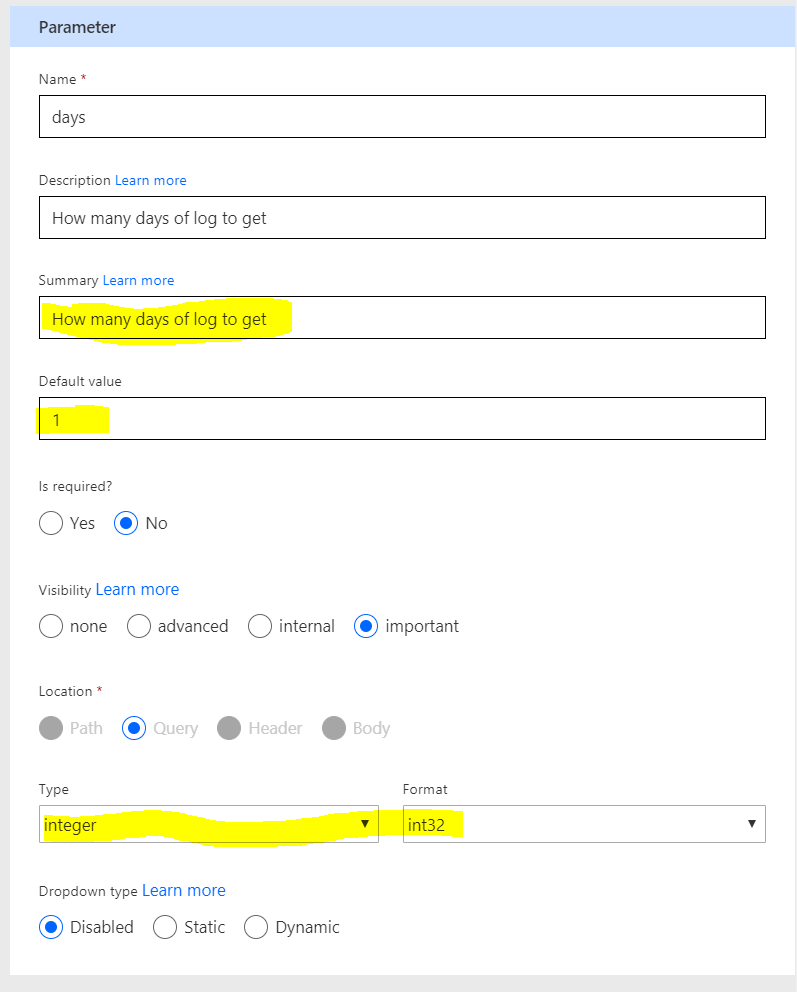
Configure the parameter, or you can leave it as default.
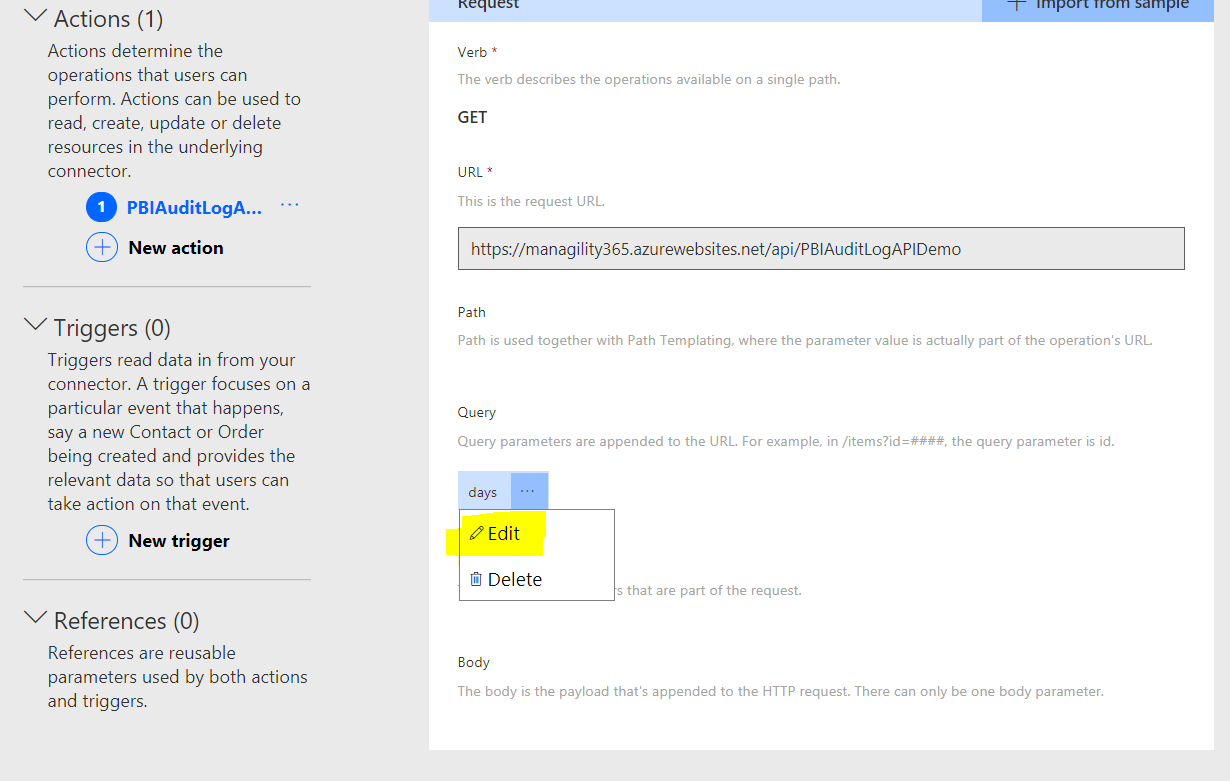
Fill in the summary input, also you can configure the type of the parameter, setting up the default value.
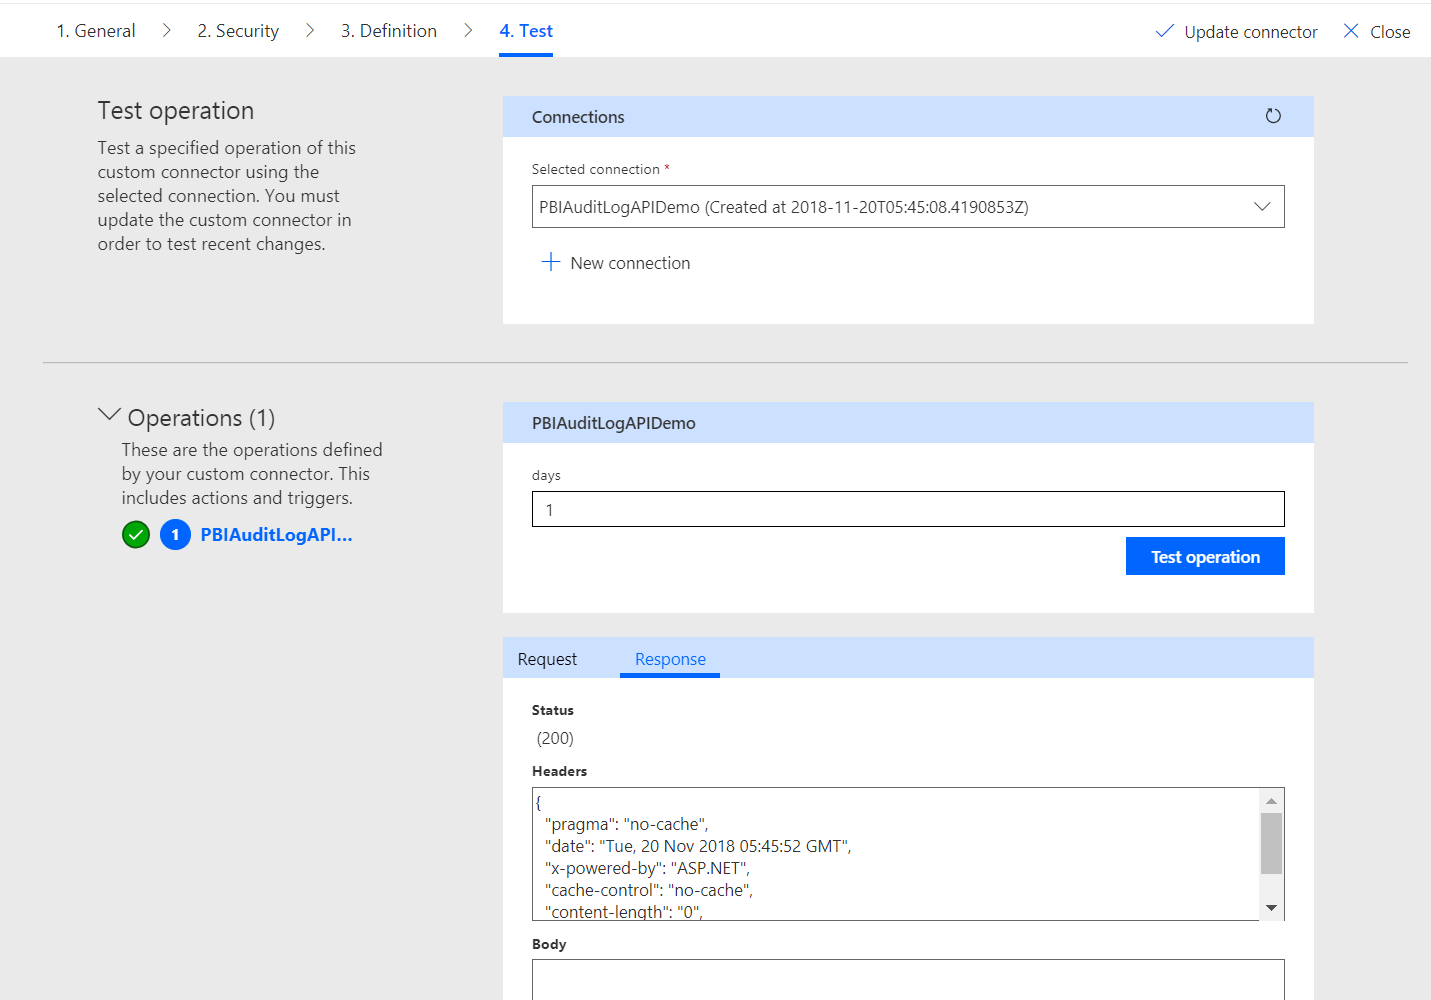
Now, we are ready to test our API actions, you must update the connector before we can test. Click Update Connector.
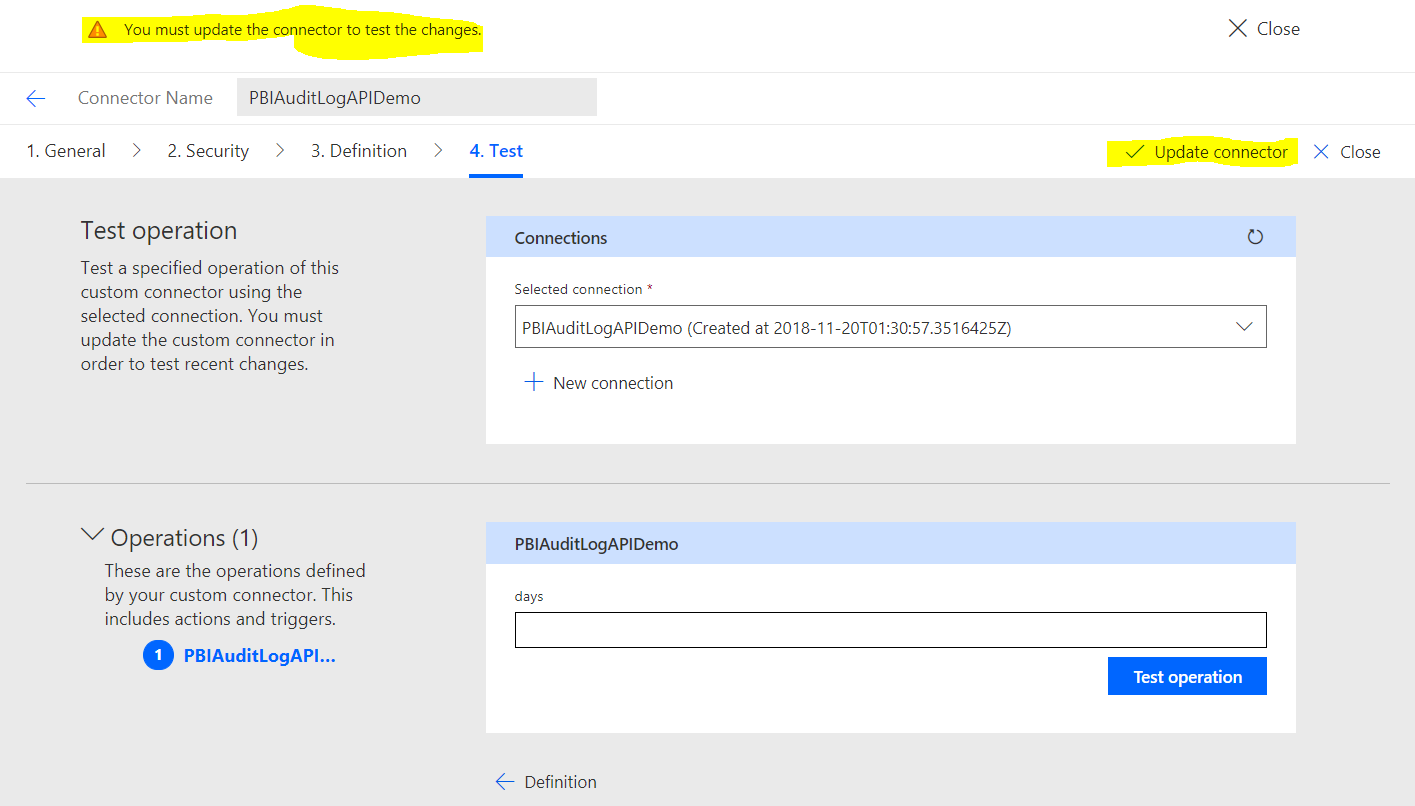
After that, we can test it and run, in the following screen, it returns a “200 successful” response.
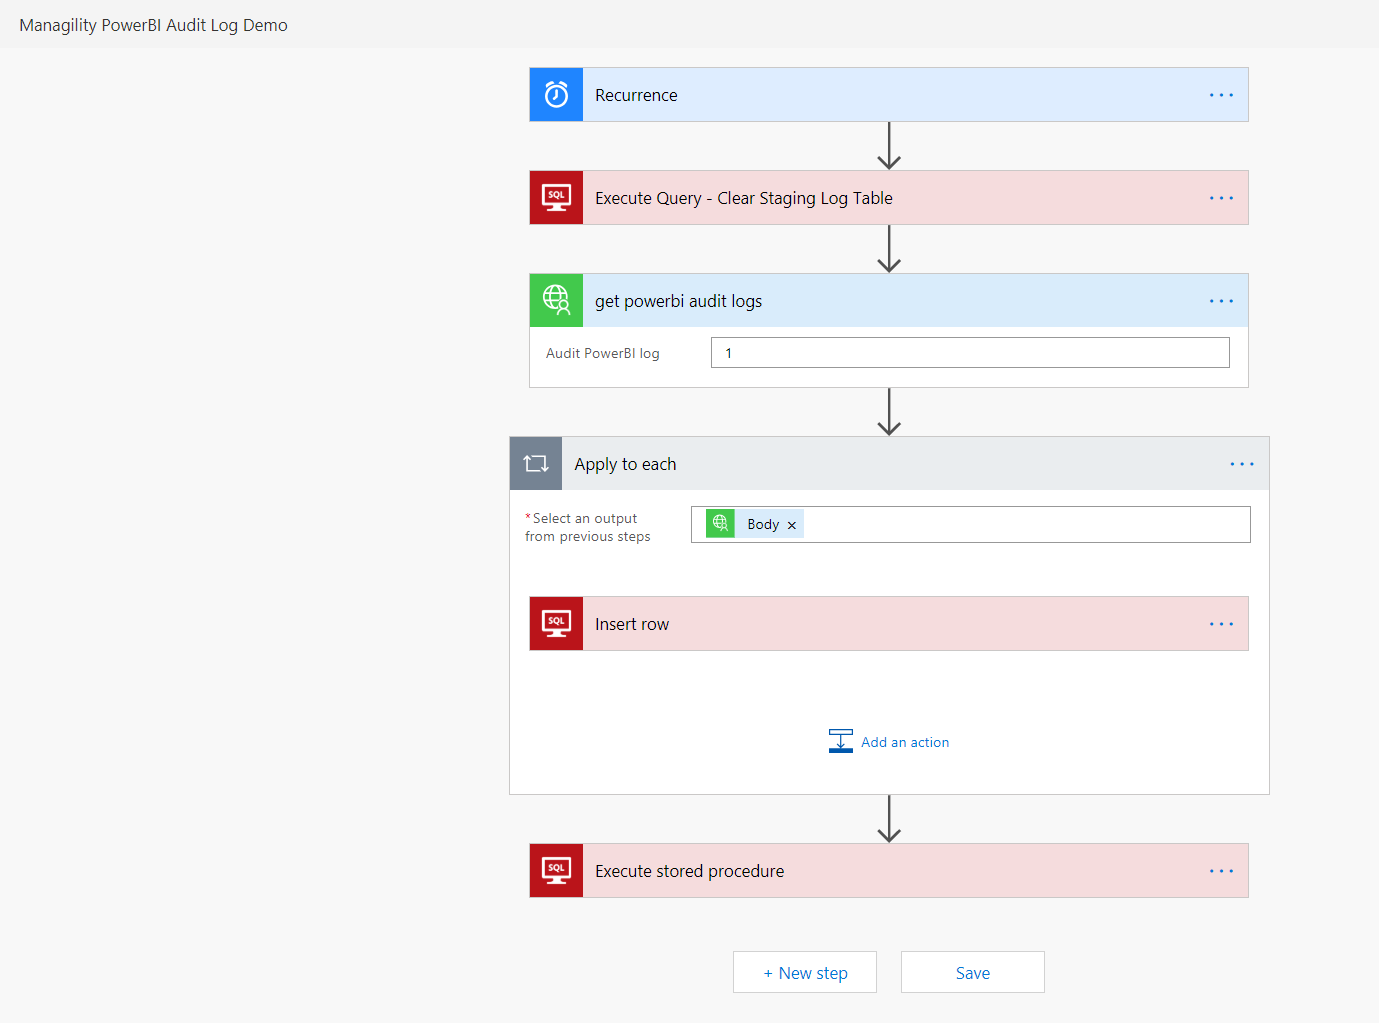
8. Add Scheduler in MS Flow for Inserting Records Into Database
We can now use the Azure function in a Microsoft Flow workflow and insert the log records into an Azure SQL database .
Table Creation Script:
CREATE TABLE [dbo].[PBIAuditLog](
[dbInsertTimeUTC] [datetime] NOT NULL,
[BatchId] [bigint] NULL,
[Id] [varchar](900) NOT NULL,
[CreationTime] [datetime] NOT NULL,
[RecordType] [varchar](8000) NULL,
[Workload] [varchar](8000) NULL,
[Activity] [varchar](8000) NULL,
[Operation] [varchar](8000) NULL,
[OrganizationId] [varchar](8000) NULL,
[UserKey] [varchar](8000) NULL,
[UserId] [varchar](8000) NULL,
[ClientIP] [varchar](8000) NULL,
[UserAgent] [varchar](8000) NULL,
[UserType] [varchar](8000) NULL,
[ObjectId] [varchar](8000) NULL,
[ItemName] [varchar](8000) NULL,
[WorkspaceId] [varchar](8000) NULL,
[WorkSpaceName] [varchar](8000) NULL,
[DashboardId] [varchar](8000) NULL,
[DashboardName] [varchar](8000) NULL,
[ReportId] [varchar](8000) NULL,
[ReportName] [varchar](8000) NULL,
[DatasetId] [varchar](8000) NULL,
[DatasetName] [varchar](8000) NULL,
[DatasourceId] [varchar](8000) NULL,
[DatasourceName] [varchar](8000) NULL,
[CapacityId] [varchar](8000) NULL,
[CapacityName] [varchar](8000) NULL,
[DataConnectivityMode] [varchar](8000) NULL,
[Schedules] [varchar](8000) NULL,
[GatewayId] [varchar](8000) NULL,
[GatewayName] [varchar](8000) NULL,
[GatewayType] [varchar](8000) NULL,
[ImportId] [varchar](8000) NULL,
[ImportSource] [varchar](8000) NULL,
[ImportType] [varchar](8000) NULL,
[ImportDisplayName] [varchar](8000) NULL,
[OrgAppPermission] [varchar](8000) NULL,
[UserInformation] [varchar](8000) NULL,
[ArtifactId] [varchar](8000) NULL,
[ArtifactName] [varchar](8000) NULL,
[TileText] [varchar](8000) NULL,
[IsSuccess] [varchar](8000) NULL,
[DataflowRefreshScheduleType] [varchar](8000) NULL,
[DataflowType] [varchar](8000) NULL,
[ReportType] [varchar](8000) NULL,
[FolderObjectId] [varchar](8000) NULL,
[FolderDisplayName] [varchar](8000) NULL
) ON [PRIMARY]
GO
Next we can create the simple flow to insert log record into this table.
9. Power BI Connect to SQL Server table and analyse Audit log Data
Below you can see two screenshots of a related sample Power BI dashboard.


A special feature that you can see here, is that we are retrieving the geographic location from the IP address using an API call in Power BI. We will cover how this can be done in Power BI in our next blog. Follow us on Twitter @managilitybi and stay tuned!